My Crimson Cruiser - 1996 GMC 1500 Project

Disclaimer: Links on this page pointing to Amazon, eBay and other sites may include affiliate code. If you click them and make a purchase, we may earn a small commission.

aldang25879

I'm Awesome
Joined
May 4, 2024
Messages
174
Reaction score
353
Location
Arkansas
You must be registered for see images attach

While waiting for parts today I worked on the adhesive on the chrome trim. which the parts finally arrived so I can start work on the suspension.

Basically to get this trim off, work the trim itself off with a big flat head screwdriver. Peel it all off. Then take a heat gun to the white adhesive pictured, for 4-8 seconds and then roll it off with your finger. Do this in little sections at a time. Use a good glove or your hands will chafe really bad. Even with gloves my hands are pretty scuffed up so expect that.

It’ll look like the top line when you’re done rolling it off. Then you can get to the goo gone and scrubbing and pressure washing it. I’ll cover all that once I do it, but now that my parts are here I’m gonna dig into the suspension
 
Last edited:

aldang25879

I'm Awesome
Joined
May 4, 2024
Messages
174
Reaction score
353
Location
Arkansas
Lil update while I take a break:

You must be registered for see images attach

Driver side is looking good, I’ve gotten the tie rods and sway bar link out. Caliper off of course. Nothing else yet.
You must be registered for see images attach

Passenger side is looking good, I’ve got the brake caliper and the spindle off, tie rods off, I’ve got upper and lower ball joints broken loose and I’m working on getting the control arms off.
 

Attachments

  • IMG_2624.jpeg
    IMG_2624.jpeg
    370.6 KB · Views: 6

aldang25879

I'm Awesome
Joined
May 4, 2024
Messages
174
Reaction score
353
Location
Arkansas
The brake caliper is what you wanna get out of the way before starting. It’s a pretty big Allen, 3/8 size. I didn’t have one but once I got one it came out. One on the top and one on the bottom, backside of the caliper. Tie it up on the circular frame holes behind your fender guards. You’ll see an example of this later.
You must be registered for see images attach

I think the tie rods were 18mm. That’s where you start. Take the cotter pin out of both, and then loosen the nuts. Break your outer rod loose by hitting the mount. NOT the stud or tie rod itself. Hit it with a metal mallet of a good size. It’ll pop loose, take it out.

For the inner, take the nut all the way off and put it back in upside down, “castle walls” facing into the thread. Make it flush with the stud so that the end of the stud is a flat surface with the nut. Carefully, but with some power behind it, hit the nut and stud until it breaks your inner tie rod loose.

The sway bar link is 13mm’s all day. The nut on the bottom, on the underbelly of the control arm, has a long thread. No deep sockets I had would work.

Use a 13mm or adjustable wrench and loosen while a ratchet holds the bolt in place from the top. Once it unthreads all the way, the whole thing should just kinda fall apart and the bolt itself will come out the top.
 

aldang25879

I'm Awesome
Joined
May 4, 2024
Messages
174
Reaction score
353
Location
Arkansas
You must be registered for see images attach

Same picture I know, but that’s how you wanna tie your brake line up. The only other line to worry about is your ABS line which I’ll get to soon.

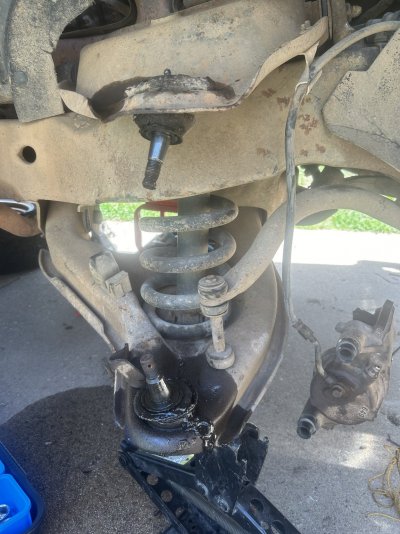
You wanna take your castle nuts off but not all the way. Take the cotter pins out, break them loose. Get them closer to the edge of the stud. This is the part where you put a jack on the lower control arm. Don’t start jacking it up yet, at least just brace it. Then, get your preferred ball joint tool and break them both loose.

I used a pickle fork and my same metal mallet. Stuck the pickle fork in there, and hammered it deeper into the joint. I did end up breaking the boots and a lot of grease came out, but you don’t have to do that. It’s okay if you aren’t re using them.

Do the same for the top ball joint.

Next is the ABS line if you have it. Personally I couldn’t figure out how to get it off the spindle. So I came back here:
You must be registered for see images attach

I took my air box assembly off and undid that 13mm. The next bracket for it is here:
You must be registered for see images attach

Remove the connector and get it off the tab holding it on the frame. I did this with a flat head screwdriver. It seems like the top part of the tab has a rectangular hole meant for a flat head. I stuck it up in that and pulled outwards and it came off.

There will also be another plastic tab on the top side of the control arm, near the right side control arm bushing. Just use pliers and press it inwards and it should press down and off the control arm.

I CAREFULLY brought this cable out of the truck and finally got my spindle off.

You must be registered for see images attach

I made sure to tape off both sides to keep the connectors uncontaminated.

Was there an easier way to do this? Probably, I just don’t know it.
 

aldang25879

I'm Awesome
Joined
May 4, 2024
Messages
174
Reaction score
353
Location
Arkansas
You must be registered for see images attach

Lower ballpoint is pressed out!! It honestly didn’t take long at all. Using a C clamp I rented at AutoZone, Once I got an attachment that fit around the boot on top but wasn’t bigger than the joint, and a cup that was bigger than the joint on the bottom, I turned it with a ratchet. The pop and everything falling apart was really satisfying!
You must be registered for see images attach

On the other hand. This was a PAIN. Parts stores have the WORST spring compressor but we made it work. I got it to compress a little bit and just used all my extensions and lowered the arm from a good distance. Gave it a little kick and the thing flew out right there. Freakin dangerous but I made it work. I really don’t like the whole spring thing.
 

aldang25879

I'm Awesome
Joined
May 4, 2024
Messages
174
Reaction score
353
Location
Arkansas
You must be registered for see images attach

Before I did the spring though I did the shock. The top nut will spin the entire shock, so do what I did and put an adjustable wrench on it. There’s a square part at the top of the stud that is specifically made for this. The bottom is just two bolts that come right on out no problems. Then you can just bring it through the bottom and take it out.
 

Drunkcanuk

I'm Awesome
Joined
Jul 22, 2021
Messages
3,049
Reaction score
8,879
Location
Alberta, Canada
You must be registered for see images attach

Before I did the spring though I did the shock. The top nut will spin the entire shock, so do what I did and put an adjustable wrench on it. There’s a square part at the top of the stud that is specifically made for this. The bottom is just two bolts that come right on out no problems. Then you can just bring it through the bottom and take it out.
Just don't do what I did when I dropped mine last year..... forgot to put the damn new shock back in and had everything back together and bolted down and truck off the stands before I realized!!! Lol
 

aldang25879

I'm Awesome
Joined
May 4, 2024
Messages
174
Reaction score
353
Location
Arkansas
Just don't do what I did when I dropped mine last year..... forgot to put the damn new shock back in and had everything back together and bolted down and truck off the stands before I realized!!! Lol
That’s for that static slammed crew lmao. When they get so low the car bounces for a good 3-4 seconds every bump

if I did that, I’d have to take a real good break before I fixed it.
 
Top