No dome light after evap replacement

Disclaimer: Links on this page pointing to Amazon, eBay and other sites may include affiliate code. If you click them and make a purchase, we may earn a small commission.

chevman_88

Newbie
Joined
Nov 4, 2020
Messages
45
Reaction score
33
Location
Utah
Just finished replacing my entire HVAC system (this was a bear went through several variations of every part and every connection was seized), reinstalled the dash and checking everything out before recharging the AC (holding vacuum perfectly). It seems I lost dome and map lights when I open the door or use the light switch to manually turn them on. My door lights and under dash lights still work as they should. If I use the map light buttons they still work, so I know it's not the bulb and it is getting power.

I've read quite a few posts talking about this circuit, but most times it's all the interior lights and the only one I found similar they just spliced in new grounds. Any ideas? Where does the white ground for the ceiling lights split off from the dash/door lights? Wiring schematics I've found have been less than helpful.
 

chevman_88

Newbie
Joined
Nov 4, 2020
Messages
45
Reaction score
33
Location
Utah
Update: Went through the service manuals for a 98, as 99 is missing. Problem I ran into is that this specific issue has you test a bunch of points using the Interior Lamp Control Module Connector, but if you have RPO AU0 (remote keyless entry) you are not going to have this module. In the wiring diagram I am trying to locate the following physical connector/splices:

Ground points
S417 - Splice to join overhead lights - Front-to-Rear Body Harness, approx. 20 cm into Crossbody Harness Breakout
C301 - Overhead connector - LF Kick panel (pg 47 fig 62 conn 202-20,56)
S246 - Splice to join all Interior lights - Crossbody Harness, approx. 22 cm from LF Door Harness Breakout

Hot points
S426 - Splice to join overhead lights - Front-to-Rear Body Harness, approx. 29 cm from Crossbody Harness Breakout, toward Rear Dome Lamp Breakout
C301 - Overhead connector - LF Kick panel (pg 47 fig 62 conn 202-20,56)
S248 - Splice to join all interior lights - Crossbody Harness, approx. 10 cm from LF Door Harness Breakout

I did find where the manual states those points are, however, it is relative to another part. If someone would be able to get me pointed in the right direction it would be greatly appreciated.
 

Road Trip

Supporting Member
Supporting Member
Joined
Jul 8, 2023
Messages
1,669
Reaction score
4,739
Location
Syracuse, NY
Update: Went through the service manuals for a 98, as 99 is missing.

Sir, if you look at reply #77 of the FSM thread you will find the links for the '99 model year. ('99 FSM links)

FWIW I can vouch that these links work, and that the .pdf files I downloaded match my
4-volume hardcopy set. (I also own a '99 GMT400.) There are some differences between
the '98 & '99 manuals, so possibly there's a better wiring diagram in this version?

Best of luck --
 

chevman_88

Newbie
Joined
Nov 4, 2020
Messages
45
Reaction score
33
Location
Utah
Sir, if you look at reply #77 of the FSM thread you will find the links for the '99 model year. ('99 FSM links)

FWIW I can vouch that these links work, and that the .pdf files I downloaded match my
4-volume hardcopy set. (I also own a '99 GMT400.) There are some differences between
the '98 & '99 manuals, so possibly there's a better wiring diagram in this version?

Best of luck --
Thank you!
 

Road Trip

Supporting Member
Supporting Member
Joined
Jul 8, 2023
Messages
1,669
Reaction score
4,739
Location
Syracuse, NY
In the wiring diagram I am trying to locate the following physical connector/splices:

Ground points C301 - Overhead connector - LF Kick panel (pg 47 fig 62 conn 202-20,56)

I did find where the manual states those points are, however, it is relative to another part. If someone would be able to get me pointed in the right direction it would be greatly appreciated.

Greetings chevman_88,

One nice thing about the .pdf versions of these manuals is that you can do an old-school "Ctrl F"
and in seconds you can scan the entire manual for a unique word or phrase. I picked Connector
"C301" and scanned the Vol 3 & 4 .pdf file, and found this:

You must be registered for see images attach


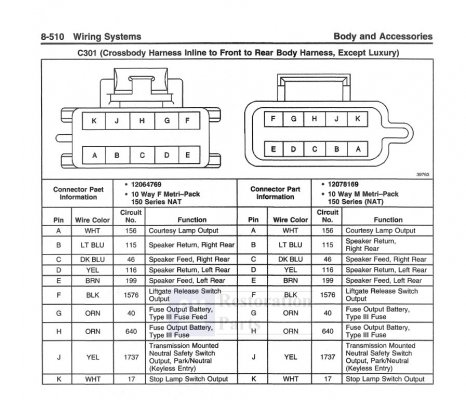
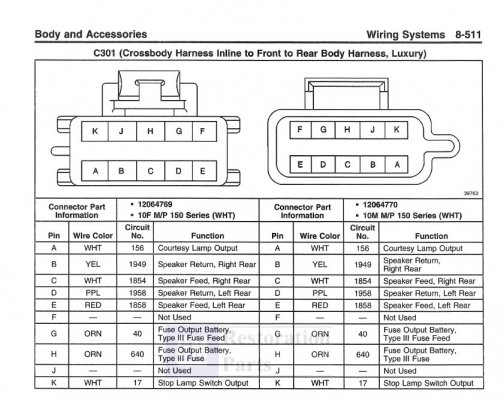
I also attached a couple of C301 pinouts. EDIT: There are standard vs Luxury pinouts?

Anyway, this just scratches the surface, for there were 27 instances of C301 reported, some in wiring diagrams,
others in troubleshooting trees. Hopefully you can find all that you need in the '99 manuals.

And when you discover the root cause and fix the problem, please reply back with the solution for others
researching similar issues. (Pics too!)

Best of luck --
 

Attachments

  • '99 C301 pinout (standard) - 99 Chevrolet & GMC CK Truck SM - Vol. 3 & 4.jpg
    '99 C301 pinout (standard) - 99 Chevrolet & GMC CK Truck SM - Vol. 3 & 4.jpg
    154.4 KB · Views: 8
  • '99 C301 pinout (Luxury) -- 99 Chevrolet & GMC CK Truck SM - Vol. 3 & 4.jpg
    '99 C301 pinout (Luxury) -- 99 Chevrolet & GMC CK Truck SM - Vol. 3 & 4.jpg
    134.2 KB · Views: 8
Last edited:

chevman_88

Newbie
Joined
Nov 4, 2020
Messages
45
Reaction score
33
Location
Utah
Greetings chevman_88,

One nice thing about the .pdf versions of these manuals is that you can do an old-school "Ctrl F"
and in seconds you can scan the entire manual for a word or phrase. I picked Connector "C301"
and scanned the Vol 3 & 4 .pdf file, and found this:

You must be registered for see images attach


I also attached a couple of C301 pinouts. EDIT: There are standard vs Luxury pinouts?

Anyway, this just scratches the surface, for there were 27 instances of C301 reported, some in wiring diagrams, others in troubleshooting
trees. Hopefully you can find all that you need in the '99 manuals.

And when you discover the root cause and fix the problem, please reply back with the solution for others researching similar issues. (Pics too!)

Best of luck --
I've seen the same, not sure what Luxury means. Now I'm trying to track down specifically S246 as that's where I think my starting point should be. Based on the harness layout diagrams I might be pulling the dash...again. Looks like the crossbody harness is the one that's in the dash. Generally in the circled area where the harness goes from the dash into the body.

You must be registered for see images attach
 

Road Trip

Supporting Member
Supporting Member
Joined
Jul 8, 2023
Messages
1,669
Reaction score
4,739
Location
Syracuse, NY
I've seen the same, not sure what Luxury means

This 'Luxury' is a clearly stated difference in the wiring diagrams, which makes sense given the additional
electrical requirements associated with power windows, rear view mirrors with an embedded Compass, etc.

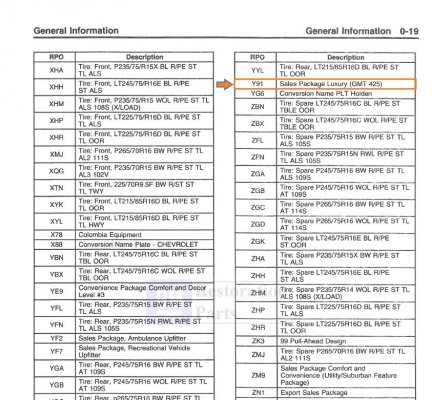
In the first attachment, RPO Y91 is the only code I could find specifically associated with 'Luxury', along
with a 'GMT425' variant associated with this RPO code.

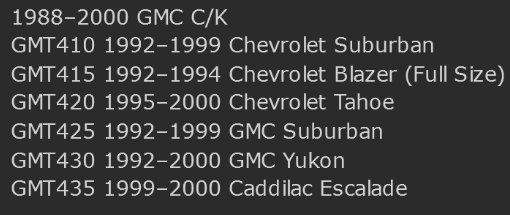
In the second attachment, I found a short listing where GMT400 sub-models were broken out elsewhere
on the Interwebs. So, from the electrical troubleshooting perspective, on higher trim level GMT400s I guess
looking for a Y91 code on the inside of the glove box door would be a good start. Meanwhile, on my 8-lugger
chore truck, the vinyl floor and manual roll up windows was all the hint I needed on which path to follow in
the wiring diagrams. YMMV.
:0)
 

Attachments

  • Y91 Luxury sales package GMT425 (arrow) -- 99 Chevrolet & GMC CK Truck SM - Vol. 1 & 2.jpg
    Y91 Luxury sales package GMT425 (arrow) -- 99 Chevrolet & GMC CK Truck SM - Vol. 1 & 2.jpg
    271.3 KB · Views: 11
  • GMT 4xx model listing.jpg
    GMT 4xx model listing.jpg
    28.4 KB · Views: 12
Last edited:

chevman_88

Newbie
Joined
Nov 4, 2020
Messages
45
Reaction score
33
Location
Utah
Hahahaha, I have a fairly optioned out burb (auto-dimming heated mirrors - good luck finding replacements for those..., fancy rear mirror, heated full power seats, etc) but there are still a few things I saw in the diagrams that I don't think I have. I wonder if those are for the 'denali/escalade' models that were only produced in this body style for a year or two.

Edit: Out of curiosity I started looking through pictures of a Denali interior and it seems to match the 'Luxury' diagrams
 
Last edited:

chevman_88

Newbie
Joined
Nov 4, 2020
Messages
45
Reaction score
33
Location
Utah
Pulled apart the dash and just have it rotated down for now vs completely removing it. Nothing obvious broken. Pulled the dome light just between the driver and passenger head rests (not the console lights, the set behind it) and found the white wire to have about 100 ohm resistance between it and a good ground. The black wire in the same bundle has 0 ohm resistance. I do measure ~12.5v between the orange and white and orange and black wire.

Wasn't able to easily find splice S246, so I'm going to shoot between connectors once I can find and verify the correct ones.
 

chevman_88

Newbie
Joined
Nov 4, 2020
Messages
45
Reaction score
33
Location
Utah
Found C301, with it disconnected I found that the orange wire has a short to ground somewhere and that the white wire at that point still has ~100 ohms resistance. This is starting to look like I'm going to need to actually remove the dash and the harness and start playing guess and check where my short is. I wish I had a layout of the entire harness in a wiring diagram (old AF avionics guy used to seeing massive wiring diagrams for aircraft) and a physical layout of where everything is.

The short to ground via that wire makes sense as my battery did drain incredibly quickly (originally just chalked it up to being a while since I had last started it and these are old batteries).
 
Top