

Ok guys. Once again, I was having another ABS Light issue with my 1994 Chevrolet Full Size Blazer 4X4. I bought it new and it has 96k miles right now. If you search my previous posts, you will find a write up from October of 2022 on the last repair made on it that seemed successful. It's been 21 months since that write up.
About two months ago, I started getting another intermittent ABS Light. It goes out when the engine is turned off, and then as soon as I would start driving, and just below 10mph, it would come on. This is the normal sequence of events when the computer checks the operation of the ABS System and finds a fault. The light eventually came on every time I drove the vehicle. Checking the codes, I got the very same codes I had in October 2022. They were, in this order, 51, 52, 12, 45, 65, 67, 46, 41, 42. Note that these codes are all electronics related and not speed or wheel sensor codes. Today, I decided to get back under the hood and check it out, initially thinking I was going to have to go through everything I did in October of 2022. I wasn't looking forward to it.
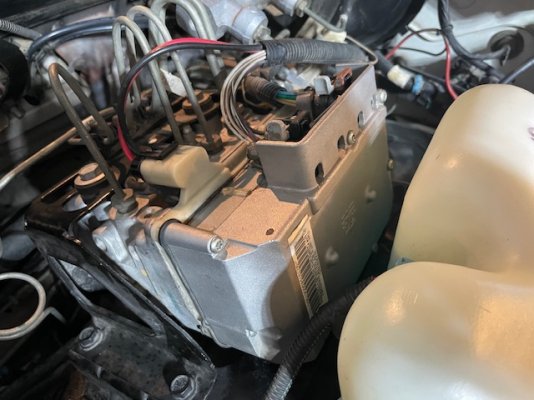
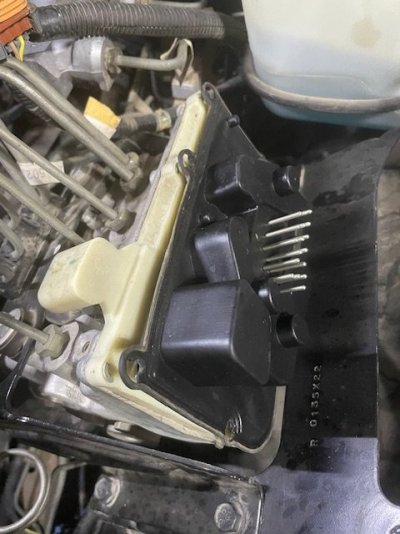
This time, this is what I did. First, turn the ignition on (don't start it) and power off any accessories (radio, AC fan, etc.). Turning off the accessories prevents voltage spikes when replacing the battery terminal later. Turn the ignition back off and disconnect the negative battery terminal. I took the washer fluid reservoir off the mounting location (three bolts) to get to the top of the ABS Module Cap. Remove the wire connectors to the cap. There are three sets of them. Thinking back, the red/black on the left probably doesn't need to be removed. It is the main power supply to the module. I set the reservoir aside, and then took the ABS Module Cap off, removing the seven security torx screws. I left the rubber part under the cap where it was and only removed the aluminum cap. Be careful with this and do it slowly so you don't damage the rubber seal between the cap and the portion below it. Pull straight away from the rest of the module. There are several long pins that fit into the electronics board under that cap. You will see them once the cap is removed.
I then took the wire connectors and the connections in the module cap and thoroughly cleaned them all with contact cleaner. They had dielectric grease on the connections and pins that I used last time during reassembly. I inspected the underside of the module cap and the electronics board. It "looked" OK from the simple visual observation. I didn't take the circuit board out of the cap. That is an involved process and risky if you are not careful. I just set it aside and finished cleaning the wire connections under the hood.
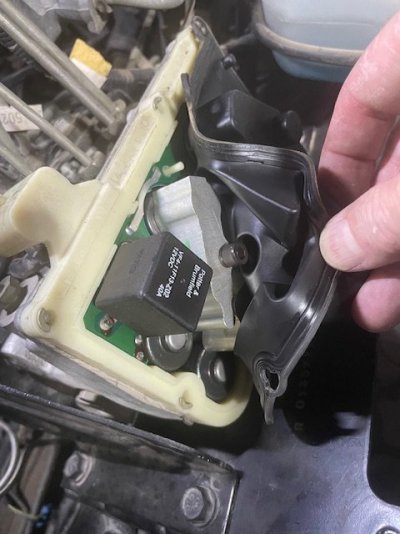
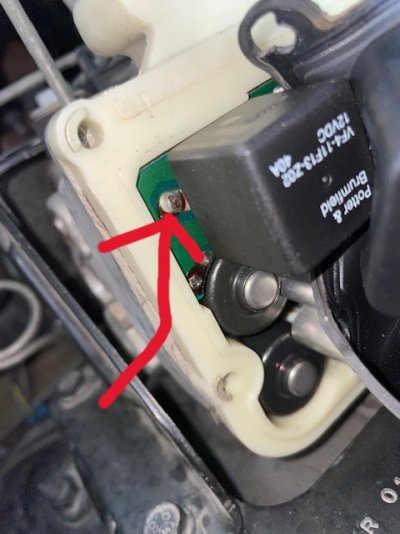
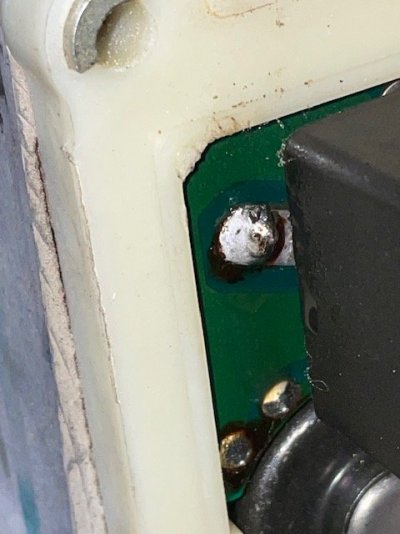
For some reason, this time, I pulled up on the rubber seal/gasket that covers the part of the module below the cap and found a large relay in the upper left corner of what would still be attached to the truck and brake system. I didn't try to remove that rubber seal, I only pulled up on the one upper left corner. Easy enough to see was the soldered attachment point at the upper left corner of the relay where it was soldered to the circuit board. There was a very obvious cold/cracked solder joint on that one pin(see the pic). The rest of them looked fine, from what I could see. After seeing this, I thought that may just be the problem, because that solder joint was obviously bad and our trucks are known for various problems in all kinds of systems because of these bad solder joints. And because all of my fault codes were electronic related.
I decided to try the repair on the vehicle, not wanting to have to deal with removing other parts of the brake system to resolder that one joint. It was simple enough to get to. I used a wire braid and flux and removed as much of the old solder as I could, cleaned it all off with a q-tip and alcohol, and then reapplied solder to the joint, being very careful not to melt the plastic and the relay I was working near and on. This was much faster and easier than what I had to do in October of 2022.
After soldering everything, reapplying dielectric grease to the connections, and putting everything back together, I gave the truck a test drive. This time...no ABS light. I cleared the codes and they stayed clear afterward.
So hopefully, someone else will benefit from this write up again. The odd thing about it is that the last write up from 2022 had the very same codes. I now wonder if this may not have been part of the problem all along and the movement of the wire connections upon reinstalling everything last time was good enough to get the solder joint I repaired this time to reconnect. Who knows. Anyway, if someone else reads post and has similar codes, try this repair first. It is much easier to do than the other repair. Although the other one DID need to be done too, because there were slight cold solders on that circuit board. But, like I said, check this first, if you have an ABS light and are getting what show up as electronic related, and not speed sensor, type trouble codes.
If you do this, and it works for you, let the rest of us know.
About two months ago, I started getting another intermittent ABS Light. It goes out when the engine is turned off, and then as soon as I would start driving, and just below 10mph, it would come on. This is the normal sequence of events when the computer checks the operation of the ABS System and finds a fault. The light eventually came on every time I drove the vehicle. Checking the codes, I got the very same codes I had in October 2022. They were, in this order, 51, 52, 12, 45, 65, 67, 46, 41, 42. Note that these codes are all electronics related and not speed or wheel sensor codes. Today, I decided to get back under the hood and check it out, initially thinking I was going to have to go through everything I did in October of 2022. I wasn't looking forward to it.
This time, this is what I did. First, turn the ignition on (don't start it) and power off any accessories (radio, AC fan, etc.). Turning off the accessories prevents voltage spikes when replacing the battery terminal later. Turn the ignition back off and disconnect the negative battery terminal. I took the washer fluid reservoir off the mounting location (three bolts) to get to the top of the ABS Module Cap. Remove the wire connectors to the cap. There are three sets of them. Thinking back, the red/black on the left probably doesn't need to be removed. It is the main power supply to the module. I set the reservoir aside, and then took the ABS Module Cap off, removing the seven security torx screws. I left the rubber part under the cap where it was and only removed the aluminum cap. Be careful with this and do it slowly so you don't damage the rubber seal between the cap and the portion below it. Pull straight away from the rest of the module. There are several long pins that fit into the electronics board under that cap. You will see them once the cap is removed.
I then took the wire connectors and the connections in the module cap and thoroughly cleaned them all with contact cleaner. They had dielectric grease on the connections and pins that I used last time during reassembly. I inspected the underside of the module cap and the electronics board. It "looked" OK from the simple visual observation. I didn't take the circuit board out of the cap. That is an involved process and risky if you are not careful. I just set it aside and finished cleaning the wire connections under the hood.
For some reason, this time, I pulled up on the rubber seal/gasket that covers the part of the module below the cap and found a large relay in the upper left corner of what would still be attached to the truck and brake system. I didn't try to remove that rubber seal, I only pulled up on the one upper left corner. Easy enough to see was the soldered attachment point at the upper left corner of the relay where it was soldered to the circuit board. There was a very obvious cold/cracked solder joint on that one pin(see the pic). The rest of them looked fine, from what I could see. After seeing this, I thought that may just be the problem, because that solder joint was obviously bad and our trucks are known for various problems in all kinds of systems because of these bad solder joints. And because all of my fault codes were electronic related.
I decided to try the repair on the vehicle, not wanting to have to deal with removing other parts of the brake system to resolder that one joint. It was simple enough to get to. I used a wire braid and flux and removed as much of the old solder as I could, cleaned it all off with a q-tip and alcohol, and then reapplied solder to the joint, being very careful not to melt the plastic and the relay I was working near and on. This was much faster and easier than what I had to do in October of 2022.
After soldering everything, reapplying dielectric grease to the connections, and putting everything back together, I gave the truck a test drive. This time...no ABS light. I cleared the codes and they stayed clear afterward.
So hopefully, someone else will benefit from this write up again. The odd thing about it is that the last write up from 2022 had the very same codes. I now wonder if this may not have been part of the problem all along and the movement of the wire connections upon reinstalling everything last time was good enough to get the solder joint I repaired this time to reconnect. Who knows. Anyway, if someone else reads post and has similar codes, try this repair first. It is much easier to do than the other repair. Although the other one DID need to be done too, because there were slight cold solders on that circuit board. But, like I said, check this first, if you have an ABS light and are getting what show up as electronic related, and not speed sensor, type trouble codes.
If you do this, and it works for you, let the rest of us know.
Attachments
Last edited: