I'm wondering the same. I'm going to follow the scheme that Road Trip laid out to see if I can get the starter to react. If not, then we're narrowing down the issue! You guys have been so helpful! I appreciate it a lot! I'm new to this level of wrenching, but really enjoy it.I'd be leaning toward a starter issue


You are using an out of date browser. It may not display this or other websites correctly.
You should upgrade or use an alternative browser.
You should upgrade or use an alternative browser.
98 K1500 motor swap but no start
- Thread starter DHud
- Start date
Disclaimer: Links on this page pointing to Amazon, eBay and other sites may include affiliate code. If you click them and make a purchase, we may earn a small commission.
(continuation from reply #16)
OK. In the previous reply we looped on error until the starter cranks the engine over
every single time we jumpered power from Pin 30 to Pin 87. By doing so, we've proven the
battery + high current paths + starter/starter solenoid are 'known good'.
But so that we don't have to pop the hood and jumper these pins every time we want to
start the vehicle, let's take a closer look at the Control side of the Cranking circuit.
****
First things first. IF you have 100% positive control over your starter using the manual jumper
method, but after plugging in the relay we're back to flaky behavior, it only takes seconds to prove/disprove
that the relay itself is at fault. The reason why is that all 3 relays on the engine side of the Underhood fuse block
are the same part number. The 1st one controls the starter, the 2nd one is for the A/C compressor, and the 3rd one
is for the fuel pump. If you have A/C, then I'd swap that relay into the cranking circuit and see if the problem remains
or is it now cured? (And if it doesn't change the behavior, go ahead and return the relays to their original positions.)
And while you are in the area, make sure that after the physical jolts from a million potholes that the connections between
the relay socket and the relay itself are still snug, not sloppy.
At this point, IF you've proven to yourself that the starter + starter solenoid + starter relay + starter relay socket are
all solid performers and yet we still have a control issue when the driver is behind the steering wheel, then we have no
choice but to dive into the cranking Control circuit below:
(Note: This is the same FSM page as in the previous reply, but this time marked up on the Control side.)
It can look a little confusing at first, but just keep in mind that all this stuff is in series, so any one
function can open the path, and not allowing current to flow through the control coil. And as we
know from Relay Theory 101, when current flows through the Control coil it will magnetically s*ck
the switch from the Normally Open to the closed position, thereby sending power down to the
known-good starter, and cranking commences.
So, the sequence of events on the Control side is as follows:
1) The Control side of the cranking circuit starts at the same exact place as the Power side: 40A Fuse 6. (IGN A)
But *this* RED wire goes to pin D5 of Connector C266 for the Ignition Switch. And this wire is Hot Always.
(Good to keep in mind when troubleshooting.)
2) Human being puts key in Ignition and turns it all the way to the START position. This connects our Always On
power to the YEL (yellow) wire, connected to D1 of C266. Starting the truck 3x per day = 1000+ cycles per year x
the number of years the Ignition Switch has been in operation. Give or take, there can be a *lot* of cycles on that
switch? But for now, let's assume the switch is good and proceed down the circuit.
3) The Yellow wire from the Ignition Switch becomes the input to the CRANK fuse, which is in the (I/P) instrument panel
fuse block. (A bit of a misnomer, for I would have named this the "Crank Control Circuit" fuse...but they didn't ask me. :0)
Just know as a troubleshooter that it's possible to blow the 40A IGN A fuse, and everything goes dead in the cranking circuit.
It's also possible to have a unblown IGN A fuse, but at the same time the 10A CRANK fuse *is* blown. It just depends upon
where the circuit fault occurred.
4) The output of the CRANK fuse is now a PPL (purple) wire which will be fed into whatever safety switch is in your truck.
If equipped with an automatic, then the purple wire is the input to the TR (Transmission Range) switch in the FSM. (In the
garage, other mechanics may give you a blank stare unless you say 'Neutral Safety' switch.)
On the other hand, the stickshift vehicles will have this purple wire as an input to the CPP (Clutch Pedal Position) switch.
These physical switches will also accrue a *lot* of cycles over the years. So if you have flaky peek-a-boo behavior, temporarily
jumpering around the switch for troubleshooting purposes may help you decide whether the switch is still good, or is flaky and
requires replacement. But don't set yourself up for heartbreak by ever leaving that troubleshooting jumper in place. (!)
5) Exiting the safety switch, the wire is now marked PPL/WHT. And this wire will be the one that goes to Pin 86 of the
Starter Relay. And since we've already proven the Power side of the circuit as well as verified the Starter Relay itself,
IF you have 12v power on your purple/white wire connected to Pin 86 (by turning the Ignition key to START) then the
truck has no choice but to start. (!)
****
So if you are still reading this, you now know more about the '96+ GMT400 starting circuit than most sentient beings on
the planet. Note that the Control side is the same as the Power side in that there is no circuit breaker involved.
Given the above, the only behavior I expect from this circuit is:
1) Turn Key to Start = Works.
2) Turn Key to Start = 40A Fuse IGN A blows in Underhood Fuse block. Bad component or wiring harness chafe to ground.
3) Turn Key to Start = 10A Fuse CRANK blows in Instrument Panel block. Bad component or wiring harness chafe to ground.
4) Turn Key to Start = Nothing happens due to failed (open) connection in wiring harness somewhere in this path.
5) Turn Key to Start = Nothing happens due to installed Safety Switch not in correct position (good switch) or is in correct position yet still open. (Bad switch)
6) Turn Key to Start = Nothing happens due to worn contacts within Ignition Switch causing open circuit.
EDIT: Of course I didn't document that feeding +12V to the starter, but there's no solid ground for that current to return
back to the battery will = no joy. But we all know that. Especially after an engine swap. Good grounds are good housekeeping. :0)
That's pretty much it. So if the entire vehicle loses power after attempting to crank the engine over, I cannot explain that
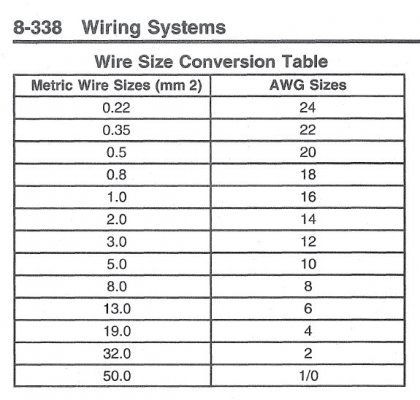
via this circuit. However, practical experience has shown me that if I have a marginal connection on the high current side
of the starter (Look for the '32' {metric} sized wires in the wiring diagram) ...when I suddenly try to pull the 150-200 amps at
the starter I can have this darken the entire truck. And sometimes this will come back on it's own. (cooling maybe?) And other
times all it takes it to twist the offending marginal connection by hand, and the entire truck springs right back to life?
****
All of the above is simply shared as food for thought. But my goal for sharing all this is for you to be able to troubleshoot
to the root cause in as few moves as possible. And more importantly, once you fix this you will understand exactly why it
failed in the first place. (Personally, I've fixed stuff never knowing exactly what the solution was, and I get no satisfaction
from that. You know, the all night thrash 'cuz you gotta drive it to work the next morning, and suddenly it starts working?
Is it going to *stay* working, or strand me at work? WTF? :-(
But at the same time I like do enjoy a 'premeditated fix', where I narrow the problem down by reasoning to 'It has to be this"
...and it is. (!)
****
Happy Hunting! And please be sure to let us know what you discover, for the benefit of others also fighting the good fight
to keep those old brutes on the road & earning their keep.
Cheers --
OK. In the previous reply we looped on error until the starter cranks the engine over
every single time we jumpered power from Pin 30 to Pin 87. By doing so, we've proven the
battery + high current paths + starter/starter solenoid are 'known good'.
But so that we don't have to pop the hood and jumper these pins every time we want to
start the vehicle, let's take a closer look at the Control side of the Cranking circuit.
****
First things first. IF you have 100% positive control over your starter using the manual jumper
method, but after plugging in the relay we're back to flaky behavior, it only takes seconds to prove/disprove
that the relay itself is at fault. The reason why is that all 3 relays on the engine side of the Underhood fuse block
are the same part number. The 1st one controls the starter, the 2nd one is for the A/C compressor, and the 3rd one
is for the fuel pump. If you have A/C, then I'd swap that relay into the cranking circuit and see if the problem remains
or is it now cured? (And if it doesn't change the behavior, go ahead and return the relays to their original positions.)
And while you are in the area, make sure that after the physical jolts from a million potholes that the connections between
the relay socket and the relay itself are still snug, not sloppy.
At this point, IF you've proven to yourself that the starter + starter solenoid + starter relay + starter relay socket are
all solid performers and yet we still have a control issue when the driver is behind the steering wheel, then we have no
choice but to dive into the cranking Control circuit below:
(Note: This is the same FSM page as in the previous reply, but this time marked up on the Control side.)
You must be registered for see images attach
It can look a little confusing at first, but just keep in mind that all this stuff is in series, so any one
function can open the path, and not allowing current to flow through the control coil. And as we
know from Relay Theory 101, when current flows through the Control coil it will magnetically s*ck
the switch from the Normally Open to the closed position, thereby sending power down to the
known-good starter, and cranking commences.
So, the sequence of events on the Control side is as follows:
1) The Control side of the cranking circuit starts at the same exact place as the Power side: 40A Fuse 6. (IGN A)
But *this* RED wire goes to pin D5 of Connector C266 for the Ignition Switch. And this wire is Hot Always.
(Good to keep in mind when troubleshooting.)
2) Human being puts key in Ignition and turns it all the way to the START position. This connects our Always On
power to the YEL (yellow) wire, connected to D1 of C266. Starting the truck 3x per day = 1000+ cycles per year x
the number of years the Ignition Switch has been in operation. Give or take, there can be a *lot* of cycles on that
switch? But for now, let's assume the switch is good and proceed down the circuit.
3) The Yellow wire from the Ignition Switch becomes the input to the CRANK fuse, which is in the (I/P) instrument panel
fuse block. (A bit of a misnomer, for I would have named this the "Crank Control Circuit" fuse...but they didn't ask me. :0)
Just know as a troubleshooter that it's possible to blow the 40A IGN A fuse, and everything goes dead in the cranking circuit.
It's also possible to have a unblown IGN A fuse, but at the same time the 10A CRANK fuse *is* blown. It just depends upon
where the circuit fault occurred.
4) The output of the CRANK fuse is now a PPL (purple) wire which will be fed into whatever safety switch is in your truck.
If equipped with an automatic, then the purple wire is the input to the TR (Transmission Range) switch in the FSM. (In the
garage, other mechanics may give you a blank stare unless you say 'Neutral Safety' switch.)
On the other hand, the stickshift vehicles will have this purple wire as an input to the CPP (Clutch Pedal Position) switch.
These physical switches will also accrue a *lot* of cycles over the years. So if you have flaky peek-a-boo behavior, temporarily
jumpering around the switch for troubleshooting purposes may help you decide whether the switch is still good, or is flaky and
requires replacement. But don't set yourself up for heartbreak by ever leaving that troubleshooting jumper in place. (!)
5) Exiting the safety switch, the wire is now marked PPL/WHT. And this wire will be the one that goes to Pin 86 of the
Starter Relay. And since we've already proven the Power side of the circuit as well as verified the Starter Relay itself,
IF you have 12v power on your purple/white wire connected to Pin 86 (by turning the Ignition key to START) then the
truck has no choice but to start. (!)
****
So if you are still reading this, you now know more about the '96+ GMT400 starting circuit than most sentient beings on
the planet. Note that the Control side is the same as the Power side in that there is no circuit breaker involved.
Given the above, the only behavior I expect from this circuit is:
1) Turn Key to Start = Works.
2) Turn Key to Start = 40A Fuse IGN A blows in Underhood Fuse block. Bad component or wiring harness chafe to ground.
3) Turn Key to Start = 10A Fuse CRANK blows in Instrument Panel block. Bad component or wiring harness chafe to ground.
4) Turn Key to Start = Nothing happens due to failed (open) connection in wiring harness somewhere in this path.
5) Turn Key to Start = Nothing happens due to installed Safety Switch not in correct position (good switch) or is in correct position yet still open. (Bad switch)
6) Turn Key to Start = Nothing happens due to worn contacts within Ignition Switch causing open circuit.
EDIT: Of course I didn't document that feeding +12V to the starter, but there's no solid ground for that current to return
back to the battery will = no joy. But we all know that. Especially after an engine swap. Good grounds are good housekeeping. :0)
That's pretty much it. So if the entire vehicle loses power after attempting to crank the engine over, I cannot explain that
via this circuit. However, practical experience has shown me that if I have a marginal connection on the high current side
of the starter (Look for the '32' {metric} sized wires in the wiring diagram) ...when I suddenly try to pull the 150-200 amps at
the starter I can have this darken the entire truck. And sometimes this will come back on it's own. (cooling maybe?) And other
times all it takes it to twist the offending marginal connection by hand, and the entire truck springs right back to life?
****
All of the above is simply shared as food for thought. But my goal for sharing all this is for you to be able to troubleshoot
to the root cause in as few moves as possible. And more importantly, once you fix this you will understand exactly why it
failed in the first place. (Personally, I've fixed stuff never knowing exactly what the solution was, and I get no satisfaction
from that. You know, the all night thrash 'cuz you gotta drive it to work the next morning, and suddenly it starts working?
Is it going to *stay* working, or strand me at work? WTF? :-(
But at the same time I like do enjoy a 'premeditated fix', where I narrow the problem down by reasoning to 'It has to be this"
...and it is. (!)
****
Happy Hunting! And please be sure to let us know what you discover, for the benefit of others also fighting the good fight
to keep those old brutes on the road & earning their keep.
Cheers --
Attachments
Last edited:
This is golden. I'll be diving in this evening to see what I can learn. Excellent tutorial!!!(continuation from reply #16)
OK. In the previous reply we looped on error until the starter cranks the engine over
every single time we jumpered power from Pin 30 to Pin 87. By doing so, we've proven the
battery + high current paths + starter/starter solenoid are 'known good'.
But so that we don't have to pop the hood and jumper these pins every time we want to
start the vehicle, let's take a closer look at the Control side of the Cranking circuit.
****
First things first. IF you have 100% positive control over your starter using the manual jumper
method, but after plugging in the relay we're back to flaky behavior, it only takes seconds to prove/disprove
that the relay itself is at fault. The reason why is that all 3 relays on the engine side of the Underhood fuse block
are the same part number. The 1st one controls the starter, the 2nd one is for the A/C compressor, and the 3rd one
is for the fuel pump. If you have A/C, then I'd swap that relay into the cranking circuit and see if the problem remains
or is it now cured? (And if it doesn't change the behavior, go ahead and return the relays to their original positions.)
And while you are in the area, make sure that after the physical jolts from a million potholes that the connections between
the relay socket and the relay itself are still snug, not sloppy.
At this point, IF you've proven to yourself that the starter + starter solenoid + starter relay + starter relay socket are
all solid performers and yet we still have a control issue when the driver is behind the steering wheel, then we have no
choice but to dive into the cranking Control circuit below:
(Note: This is the same FSM page as in the previous reply, but this time marked up on the Control side.)
You must be registered for see images attach
It can look a little confusing at first, but just keep in mind that all this stuff is in series, so any one
function can open the path, and not allowing current to flow through the control coil. And as we
know from Relay Theory 101, when current flows through the Control coil it will magnetically s*ck
the switch from the Normally Open to the closed position, thereby sending power down to the
known-good starter, and cranking commences.
So, the sequence of events on the Control side is as follows:
1) The Control side of the cranking circuit starts at the same exact place as the Power side: 40A Fuse 6. (IGN A)
But *this* RED wire goes to pin D5 of Connector C266 for the Ignition Switch. And this wire is Hot Always.
(Good to keep in mind when troubleshooting.)
2) Human being puts key in Ignition and turns it all the way to the START position. This connects our Always On
power to the YEL (yellow) wire, connected to D1 of C266. Starting the truck 3x per day = 1000+ cycles per year x
the number of years the Ignition Switch has been in operation. Give or take, there can be a *lot* of cycles on that
switch? But for now, let's assume the switch is good and proceed down the circuit.
3) The Yellow wire from the Ignition Switch becomes the input to the CRANK fuse, which is in the (I/P) instrument panel
fuse block. (A bit of a misnomer, for I would have named this the "Crank Control Circuit" fuse...but they didn't ask me. :0)
Just know as a troubleshooter that it's possible to blow the 40A IGN A fuse, and everything goes dead in the cranking circuit.
It's also possible to have a unblown IGN A fuse, but at the same time the 10A CRANK fuse *is* blown. It just depends upon
where the circuit fault occurred.
4) The output of the CRANK fuse is now a PPL (purple) wire which will be fed into whatever safety switch is in your truck.
If equipped with an automatic, then the purple wire is the input to the TR (Transmission Range) switch in the FSM. (In the
garage, other mechanics may give you a blank stare unless you say 'Neutral Safety' switch.)
On the other hand, the stickshift vehicles will have this purple wire as an input to the CPP (Clutch Pedal Position) switch.
These physical switches will also accrue a *lot* of cycles over the years. So if you have flaky peek-a-boo behavior, temporarily
jumpering around the switch for troubleshooting purposes may help you decide whether the switch is still good, or is flaky and
requires replacement. But don't set yourself up for heartbreak by ever leaving that troubleshooting jumper in place. (!)
5) Exiting the safety switch, the wire is now marked PPL/WHT. And this wire will be the one that goes to Pin 86 of the
Starter Relay. And since we've already proven the Power side of the circuit as well as verified the Starter Relay itself,
IF you have 12v power on your purple/white wire connected to Pin 86 (by turning the Ignition key to START) then the
truck has no choice but to start. (!)
****
So if you are still reading this, you now know more about the '96+ GMT400 starting circuit than most sentient beings on
the planet. Note that the Control side is the same as the Power side in that there is no circuit breaker involved.
Given the above, only behavior I expect from this circuit is:
1) Turn Key to Start = Works.
2) Turn Key to Start = 40A Fuse IGN A blows in Underhood Fuse block. Bad component or wiring harness chafe to ground.
3) Turn Key to Start = 10A Fuse CRANK blows in Instrument Panel block. Bad component or wiring harness chafe to ground.
4) Turn Key to Start = Nothing happens due to failed (open) connection in wiring harness somewhere in this path.
5) Turn Key to Start = Nothing happens due to installed Safety Switch not in correct position (good switch) or is in correct position yet still open. (Bad switch)
6) Turn Key to Start = Nothing happens due to worn contacts within Ignition Switch causing open circuit.
EDIT: Of course I didn't document that feeding +12V to the starter, but there's no solid ground for that current to return
back to the battery will = no joy. But we all know that. Especially after an engine swap. Good grounds are good housekeeping. :0)
That's pretty much it. So if the entire vehicle loses power after attempting to crank the engine over, I cannot explain that
via this circuit. However, practical experience has shown me that if I have a marginal connection on the high current side
of the starter (Look for the '32' {metric} sized wires in the wiring diagram) ...when I suddenly try to pull the 150-200 amps at
the starter I can have this darken the entire truck. And sometimes this will come back on it's own. (cooling maybe?) And other
times all it takes it to twist the offending marginal connection by hand, and the entire truck springs right back to life?
****
All of the above is simply shared as food for thought. But my goal for sharing all this is for you to be able to troubleshoot
to the root cause in as few moves as possible. And more importantly, once you fix this you will understand exactly why it
failed in the first place. (Personally, I've fixed stuff never knowing exactly what the solution was, and I get no satisfaction
from that. You know, the all night thrash 'cuz you gotta drive it to work the next morning, and suddenly it starts working?
Is it going to *stay* working, or strand me at work? WTF? :-(
But at the same time I like do enjoy a 'premeditated fix', where I narrow the problem down by reasoning to 'It has to be this"
...and it is. (!)
****
Happy Hunting! And please be sure to let us know what you discover, for the benefit of others also fighting the good fight
to keep those old brutes on the road & earning their keep.
Cheers --
Forgot to mention: I also swapped the Instrument Clusters so I had accurate milage. Would that trigger anything? Like an Anti-theft system from the factory? Thanks again! Appriate your time so much!
Update - I pulled the relay fuse and jumped power from 30 to 87 - and the same thing happens: "Ping" and everything is dead. Could this be a faulty Starter/Starter Solenoid? Would a bad Solenoid create these symptoms?(continuation from reply #16)
OK. In the previous reply we looped on error until the starter cranks the engine over
every single time we jumpered power from Pin 30 to Pin 87. By doing so, we've proven the
battery + high current paths + starter/starter solenoid are 'known good'.
But so that we don't have to pop the hood and jumper these pins every time we want to
start the vehicle, let's take a closer look at the Control side of the Cranking circuit.
****
First things first. IF you have 100% positive control over your starter using the manual jumper
method, but after plugging in the relay we're back to flaky behavior, it only takes seconds to prove/disprove
that the relay itself is at fault. The reason why is that all 3 relays on the engine side of the Underhood fuse block
are the same part number. The 1st one controls the starter, the 2nd one is for the A/C compressor, and the 3rd one
is for the fuel pump. If you have A/C, then I'd swap that relay into the cranking circuit and see if the problem remains
or is it now cured? (And if it doesn't change the behavior, go ahead and return the relays to their original positions.)
And while you are in the area, make sure that after the physical jolts from a million potholes that the connections between
the relay socket and the relay itself are still snug, not sloppy.
At this point, IF you've proven to yourself that the starter + starter solenoid + starter relay + starter relay socket are
all solid performers and yet we still have a control issue when the driver is behind the steering wheel, then we have no
choice but to dive into the cranking Control circuit below:
(Note: This is the same FSM page as in the previous reply, but this time marked up on the Control side.)
You must be registered for see images attach
It can look a little confusing at first, but just keep in mind that all this stuff is in series, so any one
function can open the path, and not allowing current to flow through the control coil. And as we
know from Relay Theory 101, when current flows through the Control coil it will magnetically s*ck
the switch from the Normally Open to the closed position, thereby sending power down to the
known-good starter, and cranking commences.
So, the sequence of events on the Control side is as follows:
1) The Control side of the cranking circuit starts at the same exact place as the Power side: 40A Fuse 6. (IGN A)
But *this* RED wire goes to pin D5 of Connector C266 for the Ignition Switch. And this wire is Hot Always.
(Good to keep in mind when troubleshooting.)
2) Human being puts key in Ignition and turns it all the way to the START position. This connects our Always On
power to the YEL (yellow) wire, connected to D1 of C266. Starting the truck 3x per day = 1000+ cycles per year x
the number of years the Ignition Switch has been in operation. Give or take, there can be a *lot* of cycles on that
switch? But for now, let's assume the switch is good and proceed down the circuit.
3) The Yellow wire from the Ignition Switch becomes the input to the CRANK fuse, which is in the (I/P) instrument panel
fuse block. (A bit of a misnomer, for I would have named this the "Crank Control Circuit" fuse...but they didn't ask me. :0)
Just know as a troubleshooter that it's possible to blow the 40A IGN A fuse, and everything goes dead in the cranking circuit.
It's also possible to have a unblown IGN A fuse, but at the same time the 10A CRANK fuse *is* blown. It just depends upon
where the circuit fault occurred.
4) The output of the CRANK fuse is now a PPL (purple) wire which will be fed into whatever safety switch is in your truck.
If equipped with an automatic, then the purple wire is the input to the TR (Transmission Range) switch in the FSM. (In the
garage, other mechanics may give you a blank stare unless you say 'Neutral Safety' switch.)
On the other hand, the stickshift vehicles will have this purple wire as an input to the CPP (Clutch Pedal Position) switch.
These physical switches will also accrue a *lot* of cycles over the years. So if you have flaky peek-a-boo behavior, temporarily
jumpering around the switch for troubleshooting purposes may help you decide whether the switch is still good, or is flaky and
requires replacement. But don't set yourself up for heartbreak by ever leaving that troubleshooting jumper in place. (!)
5) Exiting the safety switch, the wire is now marked PPL/WHT. And this wire will be the one that goes to Pin 86 of the
Starter Relay. And since we've already proven the Power side of the circuit as well as verified the Starter Relay itself,
IF you have 12v power on your purple/white wire connected to Pin 86 (by turning the Ignition key to START) then the
truck has no choice but to start. (!)
****
So if you are still reading this, you now know more about the '96+ GMT400 starting circuit than most sentient beings on
the planet. Note that the Control side is the same as the Power side in that there is no circuit breaker involved.
Given the above, only behavior I expect from this circuit is:
1) Turn Key to Start = Works.
2) Turn Key to Start = 40A Fuse IGN A blows in Underhood Fuse block. Bad component or wiring harness chafe to ground.
3) Turn Key to Start = 10A Fuse CRANK blows in Instrument Panel block. Bad component or wiring harness chafe to ground.
4) Turn Key to Start = Nothing happens due to failed (open) connection in wiring harness somewhere in this path.
5) Turn Key to Start = Nothing happens due to installed Safety Switch not in correct position (good switch) or is in correct position yet still open. (Bad switch)
6) Turn Key to Start = Nothing happens due to worn contacts within Ignition Switch causing open circuit.
EDIT: Of course I didn't document that feeding +12V to the starter, but there's no solid ground for that current to return
back to the battery will = no joy. But we all know that. Especially after an engine swap. Good grounds are good housekeeping. :0)
That's pretty much it. So if the entire vehicle loses power after attempting to crank the engine over, I cannot explain that
via this circuit. However, practical experience has shown me that if I have a marginal connection on the high current side
of the starter (Look for the '32' {metric} sized wires in the wiring diagram) ...when I suddenly try to pull the 150-200 amps at
the starter I can have this darken the entire truck. And sometimes this will come back on it's own. (cooling maybe?) And other
times all it takes it to twist the offending marginal connection by hand, and the entire truck springs right back to life?
****
All of the above is simply shared as food for thought. But my goal for sharing all this is for you to be able to troubleshoot
to the root cause in as few moves as possible. And more importantly, once you fix this you will understand exactly why it
failed in the first place. (Personally, I've fixed stuff never knowing exactly what the solution was, and I get no satisfaction
from that. You know, the all night thrash 'cuz you gotta drive it to work the next morning, and suddenly it starts working?
Is it going to *stay* working, or strand me at work? WTF? :-(
But at the same time I like do enjoy a 'premeditated fix', where I narrow the problem down by reasoning to 'It has to be this"
...and it is. (!)
****
Happy Hunting! And please be sure to let us know what you discover, for the benefit of others also fighting the good fight
to keep those old brutes on the road & earning their keep.
Cheers --
that's what I was looking at earlier - Since I was able to turn the motor over by hand upon install, I'm assuming something goofy happened with the Solenoid... I may try to jump the solenoid to see if that's it and replace the whole situation.Post 14
Update - I pulled the relay fuse and jumped power from 30 to 87 - and the same thing happens: "Ping" and everything is dead. Could this be a faulty Starter/Starter Solenoid? Would a bad Solenoid create these symptoms?
Hello DHud,
Good progress! You have replicated the failure in only the Power side of this circuit. This gives
us a much smaller area to troubleshoot. There are 2 distinct failure scenarios:
* The first will be a high current power connection is marginal, and the starter/starter solenoid is a victim
of a marginal power path.
* The second will be an excessive current draw by a failed/out of spec starter/starter solenoid, and this
excessive draw is reflected back into the vehicle. In this case, the starter/starter solenoid is the perpetrator
of the failure.
How to tell? I want to focus on ' "Ping" and everything is dead. '
NOTE: Since you can break this at will, then we should be able to figure this out quickly.
You must be registered for see images attach
Please do the following:
1) Get the truck all powered up.
* Now measure the voltage directly across the battery terminals.
* Also measure the "Hot Always" +12v power bus inside the Underhood fuse block. Try to locate an unused fuse connector on the power bus. (It should match.)
TIP: Stud A and Stud B at the back of the Underhood Fuse block are easy/valid voltage check places IF those fuse locations are populated.
2) Try to crank the engine over. Everything dies. Now:
* Measure the voltage directly across the battery terminals. My suspicion (assuming a good battery) is that the full voltage will still be there.
* While the truck is still dead, now measure the "Hot Always" +12v power bus. IF it is now 0/close to zero volts, then this proves that
there is a marginal power path fault that is being stimulated by the high current draw of the starter.
On the other hand, IF the +12v power bus in the Underhood Fuse Block is the same as the battery voltage you measured across the
terminals, then this is where you should remove the starter and bench tested for excessive current draw.
EDIT: Batteries can find strange ways to fail. IF you have lost power when measured directly across the battery at this point, then there's
an internal connection fault that's stimulated by the starter's high current draw.
****
Q: Does this make sense? Note: A good battery may sag under excessive current draw by a defective starter, but as soon as the key is
released the battery will immediately spring right back to within a tenth of a volt or so of where it started. It will NOT sag for a significant
period of time, for the power comes from a chemical reaction. So it will help the troubleshooting process if you could specify how long it
takes for the lights and everything else to come back.
If it helps any, I've swapped out engines and had high current connections seem to be fine, but *pop* lose the continuity when we tried
to crank the starter. And we've had bad starters as well. But instead of guessing, I'd like to see if the "Hot Always" power bus in your
Underhood Fuse block is always the same voltage as your battery, or if it drops way off when the symptom occurs.
Hope this helps. Don't hesitate to ask questions if any further questions crop up. And good on you for duplicating the failure by
jumping across the starter relay socket -- by doing so, this eliminates a lot of tedious underdash spelunking. :0)
Best of luck!
Last edited:
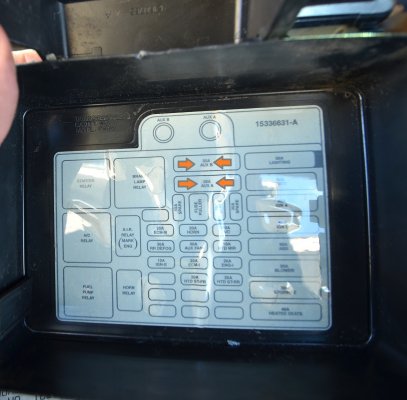
I'm sorry, but I'm a newbie to some of this... I know this is part of the underhood fuse box, but what part exactly?"Hot Always" +12v power bus
I'm sorry, but I'm a newbie to some of this... I know this is part of the underhood fuse box, but what part exactly?
No problem, I enjoy helping those willing to learn. To answer your question, if you were to flip your Underhood
Fuse block upside down, the part that connects the battery cable input to the fuses is referred to as the power bus.
What you are really looking for is something that you can easily touch with your voltmeter probe, so the "Aux A" and
Aux "B" connectors at the back are perfect for this IF the fuses feeding those are installed. I've modified the Bird's Eye
view of the fuse block to make this a little more clear:
You must be registered for see images attach
Fun fact - if you go back to the last wiring diagram, these 2 outboard power connections are referred to as 'Stud A' and 'Stud B'.
Notice that since my chore truck ('99 C2500) didn't come with any options (police, camper, etc) that would make use of these
outboard power studs , they didn't bother to populate those 2 fuse locations. However, on your vehicle if the fuses are in place then
just touch your voltmeter to one of these studs. If your truck is like mine, then while the truck is working correctly try and
probe where the circles are and 2 out of the 4 locations should reward you with a quick place to check the voltage in your
Underhood fuse block.
The idea is to find a place where you can easily compare the power in your fuse block (that feeds the entire vehicle) vs the
power right at your battery terminals. And all we're trying to do is figure out what's going on when everything goes out on
your truck right after attempting to crank the engine over.
Hope this cleared up any confusion. Happy hunting --
Attachments
Last edited:
Similar threads
- Replies
- 5
- Views
- 173
Staff online
-
 df2x44L60E Destroyer
Members online
- Charles Matzelle
- LudwigC
- scott2093
- Maxlaf226
- dotwell69
- 64294501
- Ando069
- Shawnp702543
- airdrieAMX
- 89GMCJOHN
- Tims 97 Chevy
- JPVortex
- 80zfreak
- ricosauvec1500
- mccrob
- tasmith
- kingbozo1
- nickbdavis21
- Sinister Silverado
- rigobertomanchu
- Sean Buick 76
- Fullsize
- SierraK2500
- MrJack432
- DoubleDD
- caw_86
- df2x4
- crusty
- 1lowWT
- Justin e
- dzynda
- 99xcss4
- scornedlotus
- Dahulk
- caminonut
- TB75
- obsgod
- termite
- BNielsen
- VIKING_MECHANIC
- rgb66
- Stumpy
- fancyTBI
- Swbls12b
- evilunclegrimace
- John Young
- 19richie66
- Featherhorse
- Nick88
- Charlesteneows
Total: 1,306 (members: 78, guests: 1,228)