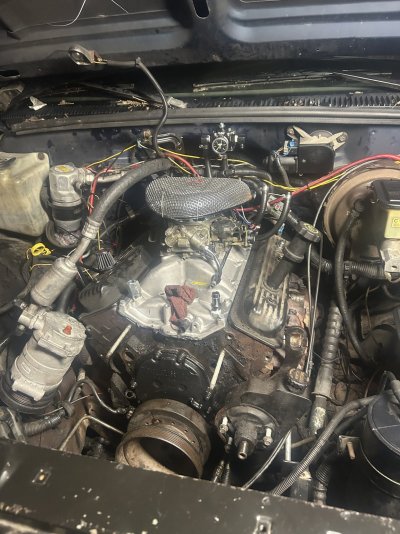
Vortec carb swap issues

Disclaimer: Links on this page pointing to Amazon, eBay and other sites may include affiliate code. If you click them and make a purchase, we may earn a small commission.

Joined
Sep 18, 2023
Messages
7
Reaction score
3
Location
Pa
1996 c2500 with the 350 vortec, I put a summit 8803 cam with beehive springs and new lifters, oil pump, and a carb swap, opted for a Holley 4160 750cfm but I’m still having issues getting it running correctly, the valves have been an ongoing issue getting them properly adjusted and so has the ignition timing and the result is I have a backfire out the carb under load, I’ve been going back and forth trying to figure it out but it’s still there and quite honestly I’m lost
 

Attachments

  • IMG_2359.jpeg
    IMG_2359.jpeg
    372.5 KB · Views: 8

Sean Buick 76

I'm Awesome
Joined
Jan 6, 2024
Messages
1,643
Reaction score
3,788
Location
Edmonton Alberta
1. Start from scratch on the valve adjustments. Back them all off and then use one of the proper procedures to get them in spec.

2. For the timing have you verified your initial, total and vacuum advance settings? For simplicity start with the vacuum advance canister disconnected and dial in the total timing. That’s the initial timing plus the mechanical advance. I use crane timing advance kits with different springs. Without knowing your combo you will want to start at about 10-15 degrees of initial timing and 30-36 degrees of total timing. I use the crane adjustable vacuum advance set to about 10 degrees on top of the total hooked to a ported vacuum source that only gets vacuum on part throttle. Only add the vacuum advance once your total timing is dialled in and your spark pls show no signs of detonation.
 
Last edited:
Joined
Sep 18, 2023
Messages
7
Reaction score
3
Location
Pa
I used a light to set the timing to 10 degrees but I forgot to disconnect the advance, so once I go back and disconnect it I should set it to 10-15 or?
1. Start from scratch on the valve adjustments. Back them all off and then use one of the proper procedures to get them in spec.

2. For the timing have you verified your initial, total and vacuum advance settings? For simplicity start with the vacuum advance canister disconnected and dial in the total timing. That’s the initial timing plus the mechanical advance. I use crane timing advance kits with different springs. Without knowing your combo you will want to start at about 10-15 degrees of initial timing and 30-36 degrees of total timing. I use the crane adjustable vacuum advance set to about 10 degrees on top of the total hooked to a ported vacuum source that only gets vacuum on part throttle. Only add the vacuum advance once your total timing is dialled in and your spark pls show no signs of detonation.
 

Sean Buick 76

I'm Awesome
Joined
Jan 6, 2024
Messages
1,643
Reaction score
3,788
Location
Edmonton Alberta
I used a light to set the timing to 10 degrees but I forgot to disconnect the advance, so once I go back and disconnect it I should set it to 10-15 or?
Normally a HEI distributor is used then swapping to a carb I had assumed that’s what you were using.

I’m not sure how the factory timing setup will function with the carb but they are normally set at 0 with the wire disconnected.
 

Sean Buick 76

I'm Awesome
Joined
Jan 6, 2024
Messages
1,643
Reaction score
3,788
Location
Edmonton Alberta
It’s an hei distributor with a vacuum advance
Oh okay sorry, back on track then my bad. So with the vacuum advance hose disconnected most Chevy small blocks are happy at about 32-36 degrees of total timing. You have your initial timing setting which it will sit at when idling. Then once you rev the engine the mechanical advance will kick in and raise the timing. Unless you use a dial back timing light it’s tough to determine the total timing. Basically you rev the engine while using the light to check the timing. Once the timing stops rising up that’s the limit of the mechanical advance. The reason it’s important to check to see how many degrees of mechanical advance are added is so that you don’t go beyond the 32-36 max setting.

So let’s just say you have 20 degrees of mechanical timing in your distributor you can safely set the initial timing at 12 degrees and possibly as high as 16 depending on the particular engine.

Once you get to this point you can test drive it and dial in the timing a bit more as needed. Listen carefully for any pinging noises from the engine especially up hills at full throttle. If you hear any ping then back off the timing 1-2 degrees until you get no ping.

Next you can add the vacuum advance to the mix. I prefer a ported vacuum source but you can try a manifold vacuum source. Again if you get ping then look into limiting the travel of the vacuum advance canister using a tack weld or a tiny nut and bolt. Crane cams sells a kit that comes with different stiffness springs to adjust how quick the mechanical advance comes in along with a vacuum canister that you can adjust the sensitivity using an Allen key.

Some distributors have an extreme amount of mechanical advance while others have less so that’s why you need to check to see how much your is actually advancing. Mr gasket sells a bushing kit to reduce the amount of mechanical as well.

I know it sounds tedious but taking the time to dial this in will really help get it running 100%!

The first step would be setting the valves.
 
Top